Saturday, June 16, 2012
Upcoming Trip.... Family, Friends, Bushcrafting...
I am taking a trip back to my "Home" in the PNW. It has been a year since I was last able to hug my kids, tickle my Grandkids, look into my Mothers eyes and tell her how much I love her, and share laughs with my dearest and best friends! Excited? Understatement, although I am not looking forward to the physically taxing travel.
Have planned to go camping with my lovely Daughter and my 3 Grandkids (15 to 2 yrs), and get in some Bushcrafting lessons to whomever is interested (Kai, my Grandson, is 2 1/2)...
Also have another outing planned with my soon-to-turn 20 yr old Son, Lieden, which we plan on doing in minimalist style.. Talk about excited!
I plan on making many memories, taking plenty of pictures, and then sharing them with my tons of followers of this blog (that would be me and I think one other, LOL!) on this blog..
Returning on the 14th of July, and then have several orders I need to get completed.
Stay tuned friends! I'm not only excited for the trip and great times to be had, but also to share what I think will be fun and interesting pictures of the trip...
God Bless, and stay safe over the 4th!
Christof
Monday, June 11, 2012
Latest Build.... Ya gotta love Oregon Juniper!
Well Mr. Lewis (my old Neighbor buddy) that ordered my first "official" custom knife, and subsequently had me build another 2 for his Grandkids, ordered yet another for his Son-in-Law Jimmy... I had gotten a sweet deal on several Solingen (Bavarian Steel Maker) Blades, and he picked out one he felt would be a good all-around blade for the outdoors and hunting.

I agreed with his choice and he agreed with mine on the scales.. Oregon Juniper..

He left the detailed choices up to me, so I picked brass for the front guard, camel bone and pitchwood for spacers, and black-on-white for spacers.


Also decided to copy my Mora and add deer antler on the butt since it adds so much (I think) to the Oregon Juniper.

I usually buy pre-made (simple punch outs) brass bolsters/guards but found a supplier online where I got a 2" x 12" bar for $32, which will make probably a hundred guards. The pre-made ones are about $3/each, so I made a smart purchase there, although it does add a bit of time cutting and shaping my own.
Here are a few shots of the shaping process, mostly done with rasps and files, then rough shape smoothed with drum sander arbors on my drill press...


Final Sanding.......


First few coats of Tung Oil, then rubbing, rubbing, and more rubbing....


Finally, after 48 hr cure after 8 coats, the final product fully buffed and with complimenting sheath.. I'm proud of how it turned out, and although similar to my "Dream Mora", I was still able to produce a knife very similar, but still different enough to be fairly called another "One of a kind"
For larger pictures and more detail (for any who already arent aware of this), click on picture and a large version will pop up...


I've decided that it's about time for me to invest in the machine to put my "Makers Mark" or Logo, on my knives... He (that would be Mr. Lewis) came back over today (I just delivered Jimmies knife to him yesterday), and I guess Jimmy had to go show it off, and a buddy of his now wants one of my knives!! Boy oh Boy... I never would have dreamed that building one knife as a favor to an old friend would turn into this...
Hope you enjoy this build, and thanks for visiting!
I'm getting better at "progress along the way" photo taking, hopefully will get better at it.
Tuesday, May 22, 2012
Bushlore, Bushcraft.... What is it all about?
My lovely wife Pamela (pssst, dont tell her I said so) is so "tuned in", and if I may say, downright wise.
While checking out my latest posts, she asks "Will people even know what "Bushcrafting" and "Bushlore" even is, I didnt".... Hmmmmm.... Gee, why didnt I think of that?!!
Bushlore, and Bushcrafting, basically are knowledge and skills that are as old as the Human Race. It is what has kept us alive in harsh environments, what has put food in our belly when we were hungry, and even gave us the upper edge against our enemies when they attacked in OUR neighborhood.
It is knowing how to build a fire without a Bic lighter... How to shelter for the night without a credit card and a Motel 6... How to craft tools by hand, then using those tools to build better tools...
All one has to do is a simple Web search on "Bushcraft", and a million suggestions will pop up... Some are just simple blogs like this one, others elaborate sites that have thousands of members from around the world.
Most have great information, and great people. Some have some real jerks and "Cliques" that if you dont fit into their mold, you'd be better off playing the "lurker" role and just reading. They eat their young on a regular basis and many relish newcomers who try to share "knowledge" with them... How dare they. Anyway, you will soon find the good sites from the bad. The informative from the "Zombies will soon overrun the world, stock up on your M-16's and MRE's" type of site. But just about all of them have great information to glean.
""But how do I know I would even like that kind of thing"
Just about anyone who has camped, been a Boyscout or Girlscout, or simply spent time in the woods has more than likely participated in Bushcrafting, whether they realized it or not.. How many of us spent the night in the woods with nothing but our Knapsack, a frying pan, our camping knife (you know, the one with the spoon and fork attached along with a zillion other gadgets?), and a tarpaulin? A few feet of rope, 4 whittled stakes, and you had a comfy (for a kid) shelter.. A cut up potato, a couple hot dogs, and cooked over the fire, you had a meal fit for a King!
It was those experiences that brought about my love for the outdoors, and Bushcrafting in general. My best friends Steve and Joe and myself would pack our little rucksacks, grab the .22 rifles, and off we'd go... Destination? Anywhere where we were tired of walking.. Sometimes just across the field from my house. Sometimes 3 miles from Steve's home in the middle of the woods. Sometimes half a dozen miles down a set of railroad tracks (dont think "Stand by Me" the movie didnt bring back waves of happiness)....
Back then, there were no video games. Kids didnt get nabbed in their front yards. You could take a hike (literally) out in the middle of nowhere, only give a genralized description of where you would be to your parents, and always come home dirty, hungry, tired, but with a deep satiated feeling that only those who have experienced it would understand...
Bushcrafting and Bushlore are not just for men. Or kids. It's for anyone who loves the outdoors, who loves to work with their hands and tools, and those who desire to pass on skills that if it were not for Bushcrafters, probably would have disappeared a long time ago....
Making your own walking stick

You can use old-time gear
right next to the latest
technology.

You ALWAYS create
lasting memories, and
make GREAT buddies
along the way!

Never hurts to learn about the
local wood, what its good for,
what can you make with it...

And NOTHING beats
good old meat cooked
over an open fire pit..
Pamela and I cooked
all winter on this "crude"
cooking pit. From these
Brats, to a Pork Butt
that made THE best
Pulled Pork Sandwiches.

Give it a try... Leave the Cruisliner Motorhome parked for once. Take a tent and minimum equipment. Of course, read up a bit and learn some Bushcrafting/Bushlore beforehand, and give it a try... I guarantee you, when it is all said and done, you will either have the best memory and warm feelings you have ever had, or you will be disgusted and swear you will never again go roughing it without the 5th Wheel and full hook-ups...
But my guess is, a good majority of you will be in the first group... Go on, give it a try... I dare ya... ;-)
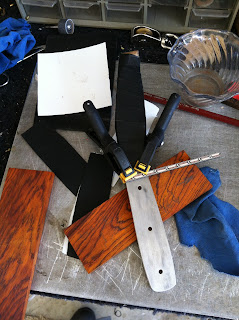
Custom "Buffalo Skinner" and another "Sheep Skinner"..
The same neighbor that started this whole knife building "Hobby" of mine has ordered several more knives. One for each of his two Grandsons, and one for his Son-in-Law..
His oldest Grandson, "Buckshot", is an avid Boar Hunter, and wanted a very aggressive blade on his skinning knife.. I showed him several designs, including the "Sheep Skinner" that his Grandad chose, but he wanted more aggressive curvature, and his pick was the Green River Buffalo Skinner (A in this picture), his little Brother "Birdshot" (I'm not kidding, those are their nicknames) wanted one like Grandpa's, the Sheep Skinner (B in this picture).

So the build was on... I didnt get many step-by-step pictures of Buckshots knife, as the first handle had a weakspot in it and while riveting the scales to the tang, it split...
But these shots are just after the epoxy had cured, and I had drilled the rivet holes.


This is also after I had filed and rasped the general shape of the handle, what I call a "Coke Bottle Lite", and sanded to about 220 grit.... The next couple pictures show it sanded further, and then with the first few coats of Tung Oil on it...

He also wanted a finger indent rather than a guard, and I obliged... But removing what may seem like a small amount of this very hard steel is not as simple as it would seem. And you always have to be careful to not overheat the steel, thus losing your Temper and turning the steel brittle. I also used Guitar inlay as I have in other knives.

Better shot of the index finger groove and also the grain of this wood. He needed a hard wood since this will be a hard working knife, and Iron wood and similar very hard woods were just not in the budget.. So I chose "Black Palm", which with the way it is stabilized, is HORRIBLY hard, and by that I mean that it took about 3 times the amount of sanding/rasping/grinding as other woods I have worked with did. It is some hard stuff!!

Chose, again with the help of my lovely helper Pamela, Red liners. They really bring out the lines between the very dark wood and brightness of the steel..

Now rivets in place, final sanding complete, and Tung Oil application started...
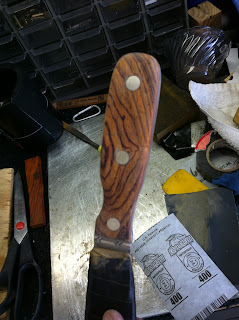
On to Birdshots Knife... I chose this "Tigerwood", I have also seen it called "Red Zebra Wood". It is a very beautiful and medium-hard wood.
Here I have just applied the guitar inlay at the front of the handle.

Now, comes the gluing of the scales.. The epoxy I use is fantastic stuff, but only gives me a 5 min work time, so attention to what you're doing is VERY important! (trust me, I found out the hard way)...


Epoxy cured, now time to start shaping.... This knife I decided to not only put an index finger notch in the bottom, as I had done his brothers, but also a thumb indent in the top. This was due to my making this "new" style of handle, I call "Lite Teardrop"..


Hmmmmm. where to start... I know many knife makers use patterns, and I really should too, since it would cut the time down quite a bit per build.. But just like cooking, I HATE going by recipes. Unless its in a box, I dont want directions. Same with carving, whittling, knife building... General idea of what they want, and if no specific type handle is given, GO WITH THE FLOW!!
So Pamela took some pictures of me chilling on the back porch, sanding from rough to eyeballed smooth and even...


Getting there....


Maybe I am just too picky, but it takes me FOREVER to get the handle just right... You really need good natural light to see the slight differences in angle, depth, grain pattern, etc... Cant overstate that...

Finally down to the 400 grit final sand.... Everything looking good...
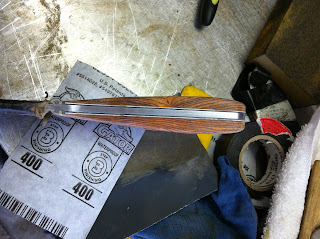
This is the thinnest tear drop style handle I have made so far... I was a little worried it would be uncomfortable being so thin at the front, but with the thumb indent at the front, this is probably one of the most comfortable knives I have made to date..
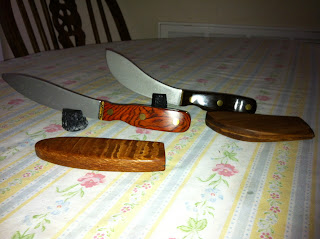
 Both Skinners finished and with wooden sheaths.
Since Buckshot wanted a "working knife", he got the plain-jane version.
Birdshot, on the other hand, was getting a "Keepsake Knife" from Grandpa, so he got the fancy exotic wood sheath for his...
Hope y'all enjoyed the build... Will be posting more soon, so keep tuned in!!
And remember my motto:
"Give a Man a piece of wood and some steel, and
he WILL build something".....
His oldest Grandson, "Buckshot", is an avid Boar Hunter, and wanted a very aggressive blade on his skinning knife.. I showed him several designs, including the "Sheep Skinner" that his Grandad chose, but he wanted more aggressive curvature, and his pick was the Green River Buffalo Skinner (A in this picture), his little Brother "Birdshot" (I'm not kidding, those are their nicknames) wanted one like Grandpa's, the Sheep Skinner (B in this picture).

So the build was on... I didnt get many step-by-step pictures of Buckshots knife, as the first handle had a weakspot in it and while riveting the scales to the tang, it split...
But these shots are just after the epoxy had cured, and I had drilled the rivet holes.


This is also after I had filed and rasped the general shape of the handle, what I call a "Coke Bottle Lite", and sanded to about 220 grit.... The next couple pictures show it sanded further, and then with the first few coats of Tung Oil on it...

He also wanted a finger indent rather than a guard, and I obliged... But removing what may seem like a small amount of this very hard steel is not as simple as it would seem. And you always have to be careful to not overheat the steel, thus losing your Temper and turning the steel brittle. I also used Guitar inlay as I have in other knives.

Better shot of the index finger groove and also the grain of this wood. He needed a hard wood since this will be a hard working knife, and Iron wood and similar very hard woods were just not in the budget.. So I chose "Black Palm", which with the way it is stabilized, is HORRIBLY hard, and by that I mean that it took about 3 times the amount of sanding/rasping/grinding as other woods I have worked with did. It is some hard stuff!!

Chose, again with the help of my lovely helper Pamela, Red liners. They really bring out the lines between the very dark wood and brightness of the steel..

Now rivets in place, final sanding complete, and Tung Oil application started...
On to Birdshots Knife... I chose this "Tigerwood", I have also seen it called "Red Zebra Wood". It is a very beautiful and medium-hard wood.
Here I have just applied the guitar inlay at the front of the handle.


Now, comes the gluing of the scales.. The epoxy I use is fantastic stuff, but only gives me a 5 min work time, so attention to what you're doing is VERY important! (trust me, I found out the hard way)...


Epoxy cured, now time to start shaping.... This knife I decided to not only put an index finger notch in the bottom, as I had done his brothers, but also a thumb indent in the top. This was due to my making this "new" style of handle, I call "Lite Teardrop"..


Hmmmmm. where to start... I know many knife makers use patterns, and I really should too, since it would cut the time down quite a bit per build.. But just like cooking, I HATE going by recipes. Unless its in a box, I dont want directions. Same with carving, whittling, knife building... General idea of what they want, and if no specific type handle is given, GO WITH THE FLOW!!
So Pamela took some pictures of me chilling on the back porch, sanding from rough to eyeballed smooth and even...


Getting there....


Maybe I am just too picky, but it takes me FOREVER to get the handle just right... You really need good natural light to see the slight differences in angle, depth, grain pattern, etc... Cant overstate that...

Finally down to the 400 grit final sand.... Everything looking good...


This is the thinnest tear drop style handle I have made so far... I was a little worried it would be uncomfortable being so thin at the front, but with the thumb indent at the front, this is probably one of the most comfortable knives I have made to date..

 Both Skinners finished and with wooden sheaths.
Since Buckshot wanted a "working knife", he got the plain-jane version.
Birdshot, on the other hand, was getting a "Keepsake Knife" from Grandpa, so he got the fancy exotic wood sheath for his...
Hope y'all enjoyed the build... Will be posting more soon, so keep tuned in!!
And remember my motto:
"Give a Man a piece of wood and some steel, and
he WILL build something".....
Friday, May 18, 2012
Finally..... My "Dream" Mora Kniv!
I have owned Mora knives since I was a kid... A few bucks, sharp as a razor, and as long as you gave them a good patina or regular oiling, they held an edge and lasted far longer than a kid could keep from losing them...
This is my EDC as of today, at least when building knives or Bushcrafting... $10 knife and until recently, was my favorite knife...

So, after I built Pamela a nice little hand carved kitchen Paring knife, I decided to take one of these inexpensive blades and see just how nice a knife I could build...
I chose Oregon Juniper for a couple reasons... First, it reminds me of home. Second, it is a VERY beautiful wood, relatively light, and when properly stabilized, tough as nails...

I also have been very poor at remembering to stop at intervals along the way to show each different step in the process... I will try to keep it interesting, i.e., not take a picture every 5 minutes, but just enough so you all can see the progression of the piece...
The blade, as I receive them...

The next few shots show it all assembled, and in the later sanding stages.. Its too bad, since it was quite a bit of work, especially with the Antler Horn rear piece and trying to get a clean fit... At this point, mostly files, rasps, and very coarse sandpaper has been used... Its now time to start with the fine stuff. I start (at this stage) with 220 grit wet/dry, ending up with 600 grit..


Now the knife hanging after an overnight soak in Pure Tung oil.... Tung Oil finish (not the laquer called "Tung Oil Finish") is the finest finish for wood, but it is a LOT of work. instead of wipe on, let dry, then buff (as is with the "finishes like Fornbys and others), it is soak, wipe off, let dry. Then rub, and rub, and rub... Then, add another coat with your fingers, and rub, and rub, and... well, you get the idea..

Now, the last few pictures are of the finished product, along with custom sheath (that has yet to be form-finished and waxed).. Big difference between the finished product and the final picture, which is of my previously favorite knife at work, finding good Fatwood...
 Enjoy, and thanks for looking...


So, after I built Pamela a nice little hand carved kitchen Paring knife, I decided to take one of these inexpensive blades and see just how nice a knife I could build...
I chose Oregon Juniper for a couple reasons... First, it reminds me of home. Second, it is a VERY beautiful wood, relatively light, and when properly stabilized, tough as nails...

I also have been very poor at remembering to stop at intervals along the way to show each different step in the process... I will try to keep it interesting, i.e., not take a picture every 5 minutes, but just enough so you all can see the progression of the piece...
The blade, as I receive them...

The next few shots show it all assembled, and in the later sanding stages.. Its too bad, since it was quite a bit of work, especially with the Antler Horn rear piece and trying to get a clean fit... At this point, mostly files, rasps, and very coarse sandpaper has been used... Its now time to start with the fine stuff. I start (at this stage) with 220 grit wet/dry, ending up with 600 grit..


Now the knife hanging after an overnight soak in Pure Tung oil.... Tung Oil finish (not the laquer called "Tung Oil Finish") is the finest finish for wood, but it is a LOT of work. instead of wipe on, let dry, then buff (as is with the "finishes like Fornbys and others), it is soak, wipe off, let dry. Then rub, and rub, and rub... Then, add another coat with your fingers, and rub, and rub, and... well, you get the idea..

Now, the last few pictures are of the finished product, along with custom sheath (that has yet to be form-finished and waxed).. Big difference between the finished product and the final picture, which is of my previously favorite knife at work, finding good Fatwood...


Subscribe to:
Posts (Atom)